Quantcast
Channel: Phil's Workbench
Viewing all 4521 articles
Browse latest View live

Book Review: James May's Man Lab

$
0
0
You are thinking, "This is one of those rubbish TV series tie-in books. Why is he blogging this?"

I would reply, because I bought it very cheap in a charity shop, think James May is very sound on the subject of spanner arrangement and anyway, I've not done much bloggable modelling for the last few days.

Man Lab is indeed a TV tie in to the series of the same name. To be honest, on telly it came across as cartoony blokey and full of set-piece stunts that we are supposed to believe are spontaneous and hilarious.

The problem is that the basic premise is men can't do proper men's stuff like making and repairing things. In telly land, this is perfectly acceptable - witness the sneering dished out to anyone who knows how to do something more useful than reading an autocue for example.

On the page, this works rather better. We actually get some useful information and because it's got a picture of the bloke who used to be in Top Gear on the front, it is acceptable to read it.

Talking of pictures, for some reason there are many cartoons of May looking very much like Garth from the Daily Mirror years ago. I'm probably the only person to have spotted this.

Subjects covered include taking a penalty, fixing a toaster, mending clocks, making fish finger sandwiches, draw a portrait, tuning a guitar, escaping from prison, fixing punctures in a bike tyre, making tea, casting a concrete worktop, polishing boots, replacing a pane of glass, making a crazy golf course, wiring a plug and getting stuck items out of a vending machine.

It's all suitably jokey but hidden in there is some proper information. There's some obvious dumbing down, and the black & white format doesn't help much, but you probably could do some of these things after just reading this book.

I particularly like the tool of the week sections covering hammers, chisels, drills (nice explanation of the difference between HSS and carbon steel bits), saws and the plane. Knowing my stuff a little, it was clear that this was accurate and even helpful. OK, the plane bit was a thin but in a world where people don't know how to carry out even the most basic DIY, if they can get over the idea that it isn't all a joke, there is stuff to learn.

Surprisingly good.

James May's Man Lab Book of usefulness on Amazon
009 RNAD van

Mystery kit

$
0
0
Mystery Kit

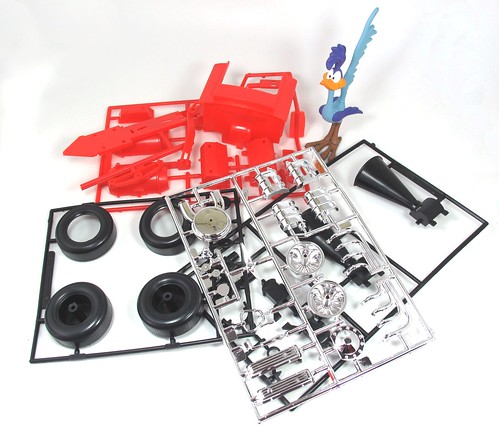
What crazyness is this? A pile of plastic parts watched over by the Road Runner?

All I'm going to say is that this could be the unholy offspring of Airfix, Hornby and Scalextic and possibly one of the strangest looking models I've built for a long while...

Can you guess what it is?

Painting Plastic

$
0
0

If anyone worked out yesterdays pile of bits was an MPC Road Runner and the Rail Rider kit, well done. Except if you cheated and looked at my Flickr page, in which case you are a bad person and are sentenced to a week at Scaleforum while wearing a "OO is good enough" t-shirt.

Anyway, I never liked the Road Runner much - I was always on the side of Wile E. Coyote. When I saw this kit in Modelzone years ago though, I knew I wanted to have a go and so in their closing down sale I picked one up, stashing it away for a rainy day.

More to the point, once I had a proper look at thing, I realised there was a problem with it. While the plastic parts may be coloured as the box says, they are the wrong colours. Snap the bits together and you'll get a model but it doesn't look much like the one in the picture.

Plastic Bits raw

For a start, the smokebox and stack are black, not red. Pedants might say that this is technically more accurate, but not in the world of Hanna Barbera. The pulley belt transferring drive from the V8 to the cylinders (why did the GWR not try this?) is red as is the block and that's definitely wrong. Red connecting rods complete the picture.

This caused me to leave the kit in the pile as I knew it meant spraying and I couldn't be bothered.

That is, until a spare red spray can became available after using it on my Dad's boat project. Out came the kit, main parts were assembled (with glue) and then primed in white no matter what the colour of their plastic. Red bits were Humbrol'd and black bits coated with Halfords fines satin black.


Plastic Bits painted
 
That's more like it. Now they just need to dry properly and we move on to final assembly. 

Rail Rider

$
0
0
Rail Rider

An hours gentle assembling later and here we have it - the Rail Rider.

Snapping the bits together took more brains than brawn in several places. I can see kids breaking plastic if they try it unaided. Attaching the engine block and smokebox to the chassis is particularly fiddly.

Thick chrome makes the smokebox door hard to fit, I ended up trimming the spigot it fits on quite severely. Stickers on the smoke stack could do to be more opaque. The version on the box art was obviously painted.

None of this matters much, the finished model is amazing. Whoever designed it is very clever indeed. A really nice touch is the loco wheel detail on those big shiny rear wheels complete with balance weights.

Meep Meep!

(Incidentally, if you think this is a waste of time, someone has gone through all the cartoons and detailed the books read by Wile E. Coyote and Acme gadgets employed on the Wikipedia page. How long did that take?)

Industrial awning

$
0
0
Canopy

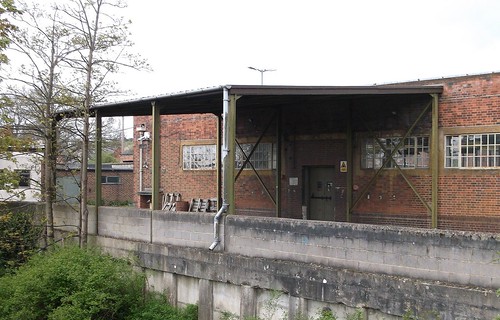
Here's a rather nice industrial detail spotted in Banbury a few days ago. While sensible people take photos of picturesque buildings, I'm attracted by the ugly bits stuck on the side of buildings.

Anyway, this can be seen walking from the station in to town. Crossing a scruffy river, there is a very square brick building on to which someone has added this awning. (I'd add a Google Streetview link for you but it's been "upgraded" so this isn't possible any more.)

I'm interested to know why it has cross braces against the wall - surely it would have made more sense to bolt the steels to the bricks?

The windows are nice. Those concrete surrounds are very model-able and far easier than brick lintels.The drainpipe sends water straight in to the river, certainly easier than plumbing it in to the drains.

I might be building some industrial stuff soon. This looks like a contender for added interest.

Topp Trains - Stafford

$
0
0
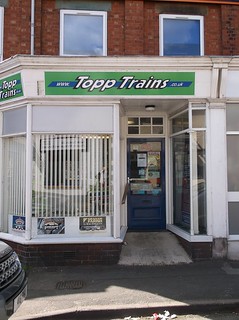
Topp TrainsPeople are always talking about model shops closing down, but there is some good news as others are opening up.

Topp Trains is a relatively new shop but in the few years since it opened its doors, the display space has doubled in size!

Entering the shop you find paint, modelling materials, wagon kits, tools, card building kits, Peco stuff and the counter. Next door is a room full of RTR trains, both new and second hand.

Prices on rolling stock range from the reasonable down to stonking bargains amongst the second hand stuff. I left with an Airfix 0-4-2 and autocoach for a mere £15 for the pair. OK, they were fitted with EM gauge wheels but these alone are worth the money.

Underneath this box was a Dapol Sprinter for a tenner. Not the best model in the world but for 10 quid?

Bachmann and Hornby ranges were well represented in both 2 and 4mm scales. If, like me, you prefer to try before you buy then you'll be well looked after.

Both Humbrol and Railmatch paints are available as well as loads of plastic sheet and strip (Evergreen and Slaters).

For a new(ish) shop, the best thing is there is already plenty of rummaging to be done. I circled it three time finding new goodies on each trip. There were plenty of ranges not normally found such as Peedie Models and the more obscure Gaugemaster bits like laser-cut sheds. That's a good sign for the keener enthusiast and a sign that the place is also run by modellers who know we need more than just train sets.

If you don't fancy the trip to Stafford, there is also a website.


Lessons in light switches

$
0
0
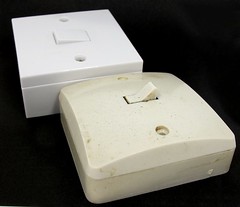
Light SwitchesSome DIY jobs need to be completed quickly - such as changing a light switch.

As this involves turning the power off in the house, it needs doing when there is least demand for electric. Sadly, that's why everyone is in bed but unless you like working by torchlight, it's not an ideal time.

So, the trick is to get things done quickly and that means having all the bits to hand.

Which is why, when the switch in our kitchen started to play up, I'm glad we bought both a new unit AND the box it fits on.

The old unit at the front of the photo, circa 1970, has a domed face and rounded corners. Modern switched are flat and square. New switch doesn't fit old box. If you try, the screws are too long as the bushes in the old box aren't deep enough, presumably to accommodate the curved face.

Changing the box was easy enough (2 screws at the same centres as the new box) and the whole job was done in under 10 minutes. Power restored and the lights now work. Even in the daytime.

Modified micro chisel

$
0
0
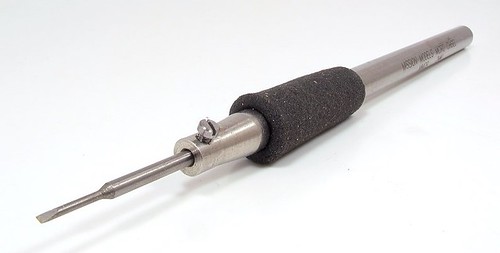
Moded Micro Chisel

This is a Micro chisel, bought from Little-Cars a few years ago*.

It's very useful as the sharp end is 1mm wide, ideal for removing moulded on detail from model trains whose value on eBay I'm in the process of ruining. The only problem with it was that the bit kept coming loose as it was retained by an Alan bolt. A very tiny Alan bolt that I couldn't find a suitable size key for.

Smaller, yes. Larger yes. Correct size, no.

Eventually I decided to do something about it and found a suitable bolt that fitted the thread pretty well. Some serious shortening (hint: put a nut on first and then once you've cut the bolt shorter, remove the nut and this will help-re-cut the damaged thread) later and it screwed into place, holding the bit perfectly.

Not pretty, but it works.

*The chisels aren't on the new site at time of writing.

Mystery Tool 1

$
0
0
MysteryTool1

As some of you may know, I'm helping out with the disbursement of the late John Webb's workshop stuff. Basically, all the tools and materials accumulated over many years modelmaking. They were all put in a room after a move and never sorted out, so it's quite a challenge.

The most interesting items are the tools John made for himself. Several of which have caused a bit of head-scratching as to exactly what they are.

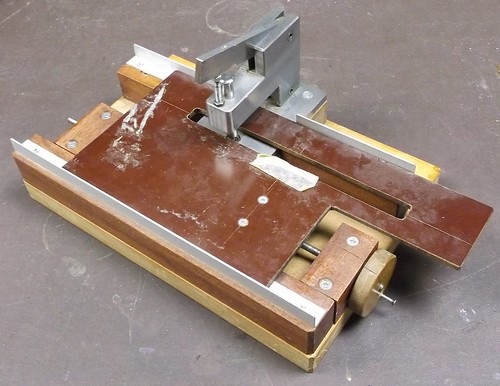
The first appears to be a rivet press - at least that's out best guess. I think it is currently missing a spring under the tool and an anvil underneath it. We've not found either of these sadly.

You might wonder why he didn't use a proprietary tool such as the excellent GW Models version. Well, the consensus of opinion is that this offers the advantage of being able to handle an entire 4mm solebar in one go whereas others require you to move the piece being worked on in the clamp.

Now, all this is a guess as obviously we can't ask the builder. Other suggestions are welcomed.

Mystery Tool 2

$
0
0
MysteryTool2

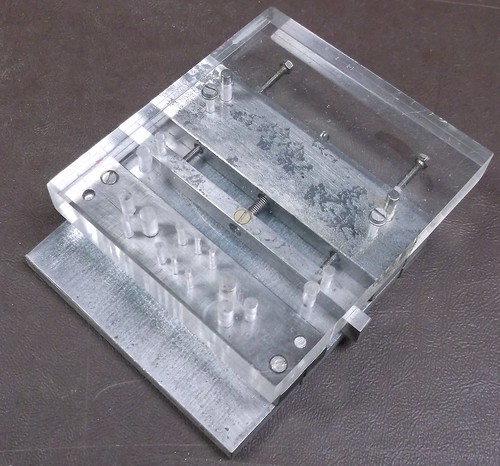
This tool would appears to be a drilling jig and our best guess is that it's for Midland Railway carriage sides. That rectangle of holes would be drilled and then joined up to form a round cornered window. More to the point, you could form a series of such windows that were accurate and identical.

The other holes are still a mystery and the guess above might be wide of the mark.

One of our members has claimed this as he thinks he has a use for it. As an engineer, he recognises the quality of the device so at least one has a good home.

Mystery Tool 3

$
0
0
MysteryTool3

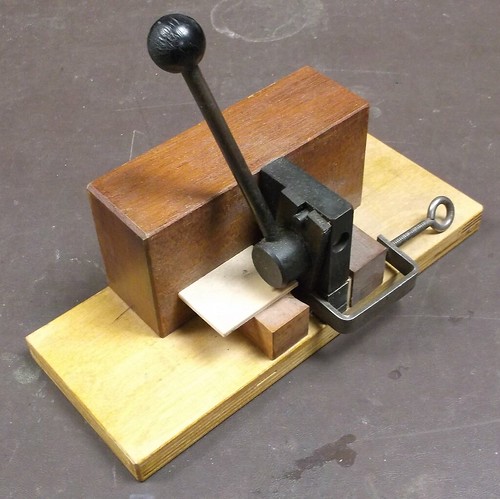
Now for the one that has the entire club stumped. If you pull the handle, a cam forces down a piece of metal into the slot above the nearest end of the clamp.

It will shear wood (we had some to hand) at 12mm lengths. There doesn't appear to be a way to change this length.

Now, the mechanism is very well built and would stand up to a lot of usage. But for what?

It's quite funny to see people pick the thing up and grandly announce, "I know what it's for..." before then stumbling and realising they don't. This has happened several times.

So, any suggestions in Blogland?

Mystery Tool 4

$
0
0
Mystery Tool

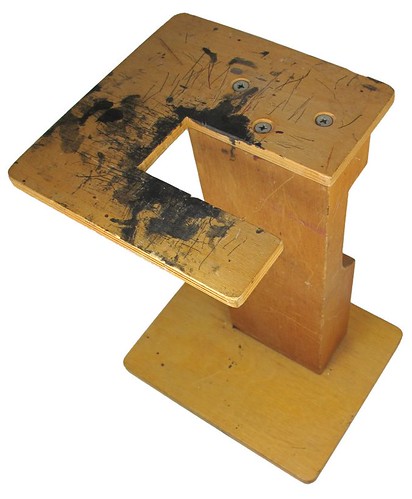
At last, a tool that I think I know the purpose of. Not at first admittedly, but once I dug through all the miscellaneous paperwork (old magazine articles, newspaper cuttings, random plans, postcards) that came with the tools, I reckon I've worked it out.

It's a carriage end painting support.

Place your carriage in vertically and then the end will be perfectly placed for lettering an lining (were carriage ends lined?). John built a lot of Midland coaches and judging by the number of cast parts in the collection, envisaged making an awful lot more.

The support is simple, but very well made. I think this one can go and live with the club airbrush and booth for anyone contemplating a bit of coachwork.

Duchess of Montrose

$
0
0
Duchess of Montrose

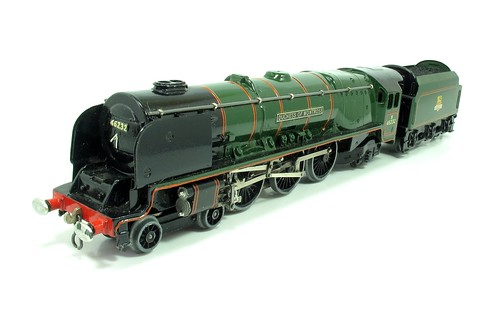
Among the items found in John's collection was this Hornby Dublo Duchess of Montrose in lovely condition. It is boxed complete with packing and spanner but no bottle of oil.

A friend tells me that as shiny paint version, it's an early model. Apparently they moved to a satin finish fairly quickly. This obviously means that the loco is worth a massive fortune.

Except it's not. A quick e-mail Pat Hammond tells me that this Duchess is the most common Dublo model. From a dealer you expect to pay £50-80. Selling, he might give you £25-40. And this is based on old figures. Since they were last checked, the number of Dublo collectors has dropped, as they go to the great model shop in the sky.

To make matters worse, Hornby Dublo stuff is so well made it doesn't wear out. In an atomic war you're probably perfectly safe sheltering under one of the many tons of HD platform to be found overpriced on every 2nd hand stall in the country.

Is a dumb picture worth a thousand smart words?

$
0
0
 
Once upon a time, authors of magazine articles saw very little feedback on their work. The odd letter might wing its way to the editor and, the letter writer would hope, make it to the letters page. Nowadays, we have many more direct methods of communication which sometimes provide feedback, but not always in a helpful way.
 
Reading stuff on-line is an occupational hazard. Sometimes (rarely) you read nice things but most of the time, those who make the effort to comment are moaning. That's not unusual - how often have you complained about poor service compared to the number of time you've made an effort to compliment good service?
 
The usual complain is that magazine's have "dumbed down" since some sort of halcyon days years ago. While digging through some 1990s mags this week, I looked to see how true this might be. After all, I don't want to "dumb down" and so expected to learn something.
 
My specialism is "How to" instructional articles so I ignored those on layouts and any reviews in my reading. What is immediately apparent is that digital photography has changed things dramatically. I illustrate every step of a project as I go - something much harder to do in the past as you relied on film cameras and, as I know to my cost, could easily end up with duff pictures when the shots returned from the processors. If you were a really good photographer with some impressive equipment, you stood a chance but most relied on a few finished shots and long pages of text.
 
Read the criticism and that's apparently what people want, but I wonder. I've built a few old kits where the instructions are a closely typed page and if I'm honest, I didn't bother reading the stuff.
 
Far better is to bullet point each step. That's the way recipes are written and Haynes manuals. I find it difficult to believe every cookbook and the mighty Haynes corporation have got it so wrong.
 
The logical next step is instead of writing long descriptions is to take a photo and show people. Show is, I'm reliably informed, better than tell. Again, follow the Haynes process. The result is a photo with relatively short caption. Is this better? I'd suggest you can see what I'm up to in the photo above without any caption at all. Describing how I paint the rusty streaks on, the patterns etc. would be far more complicated than just looking at a picture.
 
Of course this does make my articles picture-heavy and the result on the page looks very different from older magazines. However, I feel that this, along with the inclusion of sidebars for hints/tips/prototype information makes the pages much denser with information than some of those of the past which could include a fair amount of waffle. Now, I'm made to cut straight to the chase!
 
My feeling is that this is better. You certainly find more articles in a modern mag than those from the 1970s, although the much higher modern page counts help this. Some of those who complain also don't want to follow instructions, they prefer to have something to real, not anything wrong in itself, in lieu of making stuff.
 
Others think I simplify the process too much. If that's a crime, I'm guilty. However, my experience, based on magazine sales figures and talking to people at general shows from behind layouts and stands, is that there are a lot of people at the beginner end of the hobby. Far, far more than in the realm of the experienced modeller (Note: I mean practially experienced from doing some modelling, not just having read books and articles) who probably doesn't need the same level of instruction.
 
I once had an article on building an etched brass loco kit described as a "mundane activity" on a forum but suspect that for most modellers, it represents a very distant dream to work towards. The poster might knock these things out in his sleep but I still find each one a challenge and I've built a few now.
 
To compensate, I always try to include the odd tip that would appeal to me if I were the reader. Some unusual approach or suggestion. It's probably ego, but I like to think that most people can get something out of anything I write, even if they never have any plans to try the same project.


Mystery Tool 5

$
0
0
Bompers

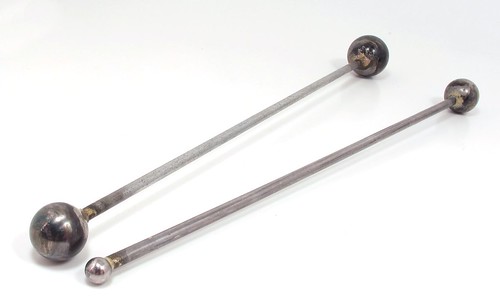
I thought I'd finished the mystery tool thread, but then, in the bottom of a bag, I found these.

Each steel rod is 15cm long and on the end is brazed a steel ball. The balls vary in size and weight - 8, 13, 21 and 38 grams.

What I think they are for is reprimanding visitors to exhibitions from behind the safety of a model railway layout. When the nasal whine gets too annoying, hold one end and swing the other so it hits the cause of the problem on the top of his bonce.

The weight swung will depend on the level of annoyance. For a particularly ripe, backpack wielding problem, I recommend the 38g thwack.

Some of you may with to suggest alternative uses for these, if so, please do this in the comments. Be careful though, I am now armed!

War Department Deans Goods

$
0
0
Dean Goods

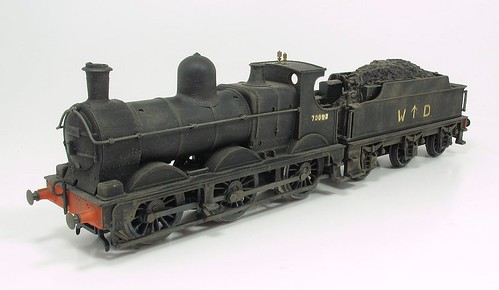
A wartime Deans Goods locomotive, manufactured by Mainline and re-painted into this livery by John Web, as far as we can tell.

62 of the engines headed abroad during WW1 with 46 of them returning at the end of the conflict. They must have been popular as 108 we requisitioned at the start of WW2. All were fitted with Westinghouse brakes and ten gained pannier tanks and condensing gear.

54 engines made it into BR service, the last being withdrawn in 1957 after a lifetime of nearly 80 years.

This model is destined to find a new home with Chris Mead and run on his wartime layout "Overlord". He's already built a pannier tank fitted version so it will be nice to have a standard one for show visitors to compare this against.

After years stored in a box, the model still lept into life when given some power. Sadly, it was the tender that worked (it's where the motor is), the loco wheels need some oil before they will rotate.

Trix electric motor

$
0
0
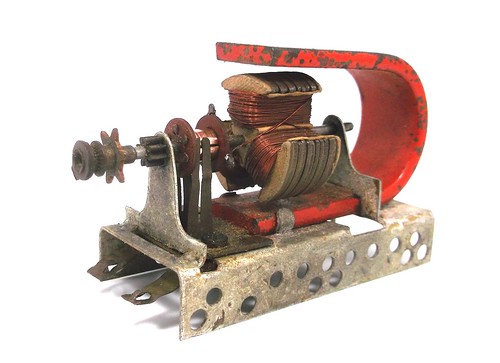
Trix electric motor

That's a Meccano motor everyone said.

And it turns out we were all wrong. It's actually from a Moto Trix construction set. Looks a bit like Meccano but the holes are spaced differently so the two aren't compatible. You can read more about these sets over on the Brigton Toy and Model Museum website.

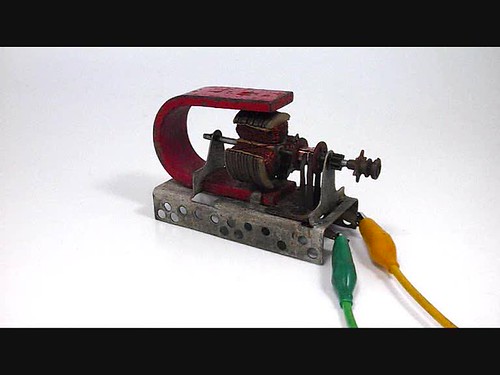
I like this because it's pure motor. Nothing is hidden away inside a casing. Back in 1936 when the motor was introduced, electricity was still a bit of a novelty to many people so for the curious child, being able to see how this magic thing worked must have been fascinating.

Best of all, my motor still operates. Given an dose of 9V from a PP3 battery, it whirs away quite happily.

Trix Motor

Wagons and a cottage in BRM

$
0
0
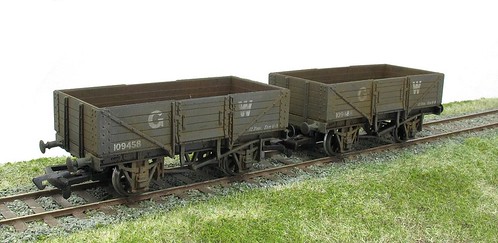
GW Wagons

Plenty of wagon action from me in the June issue of British Railway Modelling magazine. I'm hard at work saving a few second hand examples from the bin.

Starting with RTR models, there are a couple of Airfix 5-planks first made in 1978 and therefore older than many readers, but still respectable models, even today. Modifications are limited to these but as a starting point for weathering and tinkering, they are as good as it gets.

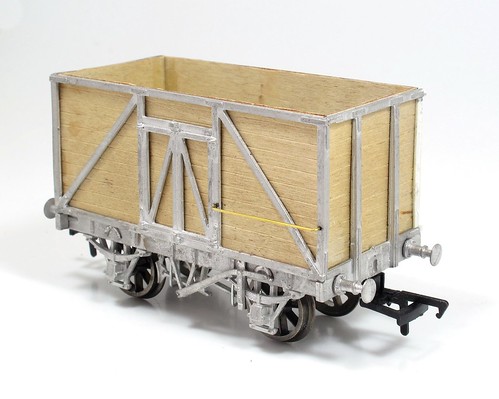
Wagon kit

I can't avoid trying an old kit too, but there doesn't seem to be much point building an ancient plastic kit. Instead, I found a really old Kenline kit produced in plywood and whitemetal. This is much older than a lot of the readers, including me. In fact I suspect most modellers will never have heard of the range at all, but then that's the fun of grubbing around in boxes under second hand stalls.

Finished Cottage 1

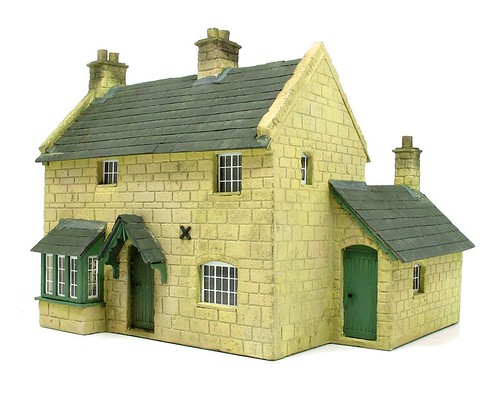
My other major project this month is a cottage kit from Petite Properties. This is a departure for me as the walls are supplied without any sort of finish. It's up to the modeller so to add this and so I've dabbled with filler and a sharply pointed tool to produce a reasonable stone finish.

You'd think scribing this would be dull but I found it relaxing and surprisingly quick. OK, the stones could be smaller but I'm just at the top end of the prototype according to some measurements I took. The kit itself is really nice and full of character so I'm looking forward to trying more from this supplier.

Finally, with the Bachmann Grain wagon in mind, I've put together a couple of pages for anyone wondering what to do with theirs. No plans to produce a definitive account, just some starting points and an overview. There's plenty to get your teeth in to with the topic so there's a reading list that you might care to work through, perhaps with a pint to hand...

I'm not sure I'm getting any better at this

$
0
0
Coke Wagons

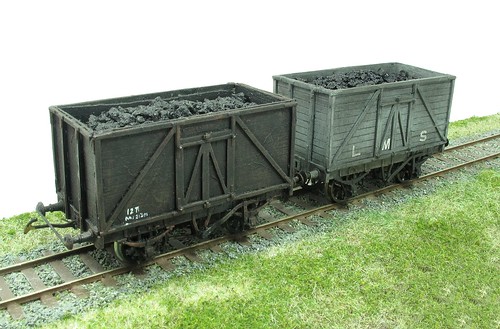
On the left, the second wagon I ever built. Constructed at least 25 years ago.

On the right, the most recent, constructed about a month ago.

Both are from the same Kenline whitemetal and plywood kit.

I'm not sure the difference in expertise shows. Perhaps the inside of the newer model isn't battered like the old one. One side of the new one is plastic strip too as the parts were missing from the second hand kit - that would have been an impenetrable stumbling block years ago.

But there isn't a quantum leap. I suppose assembling a kit well years ago and the same kit more recently probably won't show great advance but I'm not sure whether to be ashamed at my lack of improvement or proud of my achievement years ago.
Viewing all 4521 articles
Browse latest View live


<script src="https://jsc.adskeeper.com/r/s/rssing.com.1596347.js" async> </script>