Quantcast
Channel: Phil's Workbench
Viewing all 4471 articles
Browse latest View live

Deck planks and wood suppliers

$
0
0
Wooden BowOn my Dad's workbench, there is a very old Deans Marine kit for a Thames steam cruiser. A sort of posh steam powered yacht to ferry people sipping Pimms around Henley Regatta.

Anyway, the main feature of this boat is a decoratively planked deck. The kit supplies a plywood thing covered with printed paper as a guide. There's also some planking wood but only enough if you are accurate with your cuts to fractions of a millimetre.

Nuts to this, time to get hold of some replacement stripwood.

Except that the local dolls house supplier only keeps basswood. Hobbycraft is the same, even if you can find anything of use. He needed as much mahogany as basswood.

With no model boat shows on the horizon, it was off  to mail order. A few minutes spent on the Westbourne Model Boats website saw the order placed and in just under a week, the long, thin package arrived.

Not really worthy of comment you might say, except that ordering yard long lengths of wood is a bit odd. Hardly a normal shape package. Despite this, all arrived in one piece, unbroken or bent. Worth remembering for the future.

Petrol powered shunter

$
0
0
Petrol Shunter

I've been a busy chap recently, but sadly not with anything particularly blogable (unless you want the trials and tribulations of setting up a website using Joomla! - no, I didn't think you did) so to keep up my post-a-day schedule, I've been digging back through some old photos that haven't made it on here before.

First up is this shunter found at Ruddington on the Great Central Railway. As far as I can tell, it's an early petrol powered loco. I work this out because the chassis is very similar to this:

OO petrol loco

A 4mm scale petrol powered shunter I built many years ago from a Branchlines kit. My model is based on the genuine LNER version that just squeaked in to BR days. As I recall, there was also a GWR prototype in the range of 2 kits but I didn't like it as 1) it was Great Western 2) Looked like a shed on wheels.

A quick search on the loco number reveals this from Wikipedia:

Morris (works number 2028) was built at Motor Rail (Simplex) Works in Bedford and started out at Exeley & Sons Ltd in Shropshire from new. In 1935 her petrol engine was replaced by a modern diesel design and she was sold that year to Davy Morris Works in Loughborough, working there until withdrawal in the late 1980s. Arriving at Ruddington in 1990 she was the first motive power on site at the start of the railway's preservation, but was held in store for years at Rushcliffe Halt until restoration was carried out. After visits to other heritage railways she is back in regular service on shunting duties.

So I was right about the petrol burning stuff. Nice to see she's in regular use too. Our model (nicknamed "Titch") certainly is.

HST rear cab

$
0
0
HST Back cabWhile digging for yesterdays photo, I found another fascinating shot. I manged to blag a walk through the prototype HST power car under the care of the Project Miller team. I've always been fascinated by prototype railway items and so when offered, was up the steps like a rat up a drainpipe.

After a quick sit in the front cab, I was led through the engine compartment where some amazing restoration work has been taking place. I'm in awe of anyone who takes on a project like this.

At the back end, there is a driving cab.

Now this isn't unheard of - the pointy nose Class 91 electrics have a cab at the back so they can operate as normal locomotives but I didn't realise this was the case with the prototype HST.

As it happens, this is good news for the preserved machine. Being able to operate as a conventional loco without needing turning around at each end of the line is a blessing and probably means it can earn it's keep.

HST Back cab interior

Flood damage

$
0
0

With all the layouts and model boats and magazine projects I've acquired over the years, storage space at home has long since been exhausted. The solution my father and I decided on 8 years ago was to rent a storage unit at a nearby facility.

The units are ISO shipping containers - secure, accessible when we needed to get in, and thanks to roof insulation, dry.

Until yesterday. A couple of weeks ago, we'd noticed a wet box on the top of one set of shelves. This was put down to condensation. There are a couple of condensation traps in the container and we empty them out half a dozen times a year.

This time though, we had a 1/12 Wavney hull half full of water. Below it, there were lots of wet boxes. Annoyingly, this is the corner where I store past, and future projects. Quite a lot of these were very wet. Feeling around on the top of the container, there was a puddle of water in the corrugations. We have a hole.

Fortunately, the Handyman Hall railway had a damp box top but was otherwise OK. Half an hour in the sun dried it out. Barnstorff wasn't so lucky and has somewhat sodden scenery. I'm going to try to dry this out but it may be handy that it's done all the shows it needs to.

Elsewhere, there are lots of stock boxes that are more papier-mâché than cardboard. At the moment I'm seeing what I can dry out. Hopefully the contents are still OK.

On Monday, the landlord is sending someone over with a welder to sort out the hole...


Return of the Dock

$
0
0
Sandwich man with ring

The reason we were in the storage container yesterday is that it's time to unearth Melbridge Dock for testing as the layout is due to appear at the Leamington & Warwick MRS exhibition next weekend.

The club is celebrating it's 40th exhibition and the Dock will be marking it's quarter century since first appearing at the Town & Country Festival back in 1990. This is one old layout. A well travelled one too - at best guess the number of shows attended is around 100. Far too many for our badge board for a start!

I can't remember the last time we took the layout out  on the road but it's at least 3 years ago. Since then it's been stored in an unheated ISO shipping container. We do wrap the model up in plastic and an insulated bag bought from a furniture storage supplier.

Will it work? Watch this space for updates.

Fixing a dry joint

$
0
0
Fixing a dry joint

Amazingly, despite the layout's long storage, I plugged it in and every point motor tested worked straight away. Maybe the one into the front siding is a bit lazy but then it always had been - a shot of WD40 usually cures this if it becomes a problem.

This just shows how good Peco point motors - even ones over 30 years old (not all were new when we built the layout) can be. I can't have done too badly with my soldering either. The technique of making a joint, letting it cool and then giving the wire a tug presumably showed up anything dodgy at the time.

Better still, the text loco happily trundled around the track showing this works. Only one problem showed up - a dry joint in one rail on the front siding.

Spotting this was easy - the loco stopped as it made its way along the siding but when a screwdriver blade was jammed into the joint, it started up again.

Our track is home made using SMP code 75 nickel silver rail soldered to copper clad sleepers. No fishplates are used and I've always been too lazy to bond rail ends with little wire jumpers. That always seems to be too much work for a very limited improvement in reliability. Perhaps this is only fine for small layouts, but I've yet to be convinced otherwise.

Anyway, the joint had obviously failed in the past at a show and I'd just heated up some solder to a big blob to the bridge the rail gap. The resulting silver lump on the sleeper end wasn't pretty so it was time to do something about it.

First up, the solder was heated and removed with a sprung solder sucker.

Then the rail side was cleaned with a small screwdriver and then a round file. I wanted shiny metal to solder too.

A small length of brass wire was tinned, cut to length and then held in place to bridge the joint with tweezers.

Using lashings of flux and a tiny amount of solder, the wire was fixed in place. Result - a nice neat joint with good electrical conductivity. A touch of Railmatch underframe dirt was applied after the join had been cleaned with turps to remove left over flux.

Hopefully, I won't be doing an unscheduled soldering demonstration at the show this weekend!

Note: If you think I sound smug because there were so few electical problems, you are correct. My smugness glow can be seen from space.

Mouldy

$
0
0
Spotty Dock

While electric woes might have been minor on the Dock, across the cobbled areas, there were little spots of what looked like mould.

At first, I was tempted to pretend they were some sort of weathering effect but I don't think anyone would be convinced. They had to go.

Rubbing with a dry finger removed the muck from the tops of the Slaters cobbles but not from the valleys below. A wet finger worked better but still didn't remove all trace. I had a feeling that the remaining residue, even though microscopic, would have been back anyway.

A bottle of Coop anti-bacterial spray was acquired and some of the liquid poured in to a plastic cap. Dipping a cotton bud in and then rubbing it on the mould removed the mark straight away. Left to dry, the clean cobbles stood out a bit but only because they were clean of dust. At least the paint stayed put, something I'd been worried about with more vicious chemicals.

Cotton buds are fine for ears but not for model railway layouts so a softish bristle brush was tried next. This worked perfectly and within half an hour, the cobbles were clean, even in to the nooks and crannies around barrels and boxes.

Only time will tell if this is a permanent fix but at least it's a quick one if I have to repeat it.


Cobble Cleaning

Barge boards and seagulls

$
0
0
Barge Board fix

After 25 years, even when stored on the dark, plastic sheet can become brittle. At least that's my excuse for the damaged barge board on the stone warehouse. If the plastic had been fresh, then when I whacked it while moving the baseboard around, it wouldn't have broken would it?

After pondering filling the hole, I decided replacement would be quicker. Partly this is because the sheet is very thin but mostly due to the Deluxe Materials filler being dried up in the tube.

Carefully carving the old bargeboard away with a knife, I was surprised to find we'd not continued the stone effect to the edge. No idea why, but it was a long time ago. Anyway, holding the sheet against the roof allowed me to work out the replacement size and this was glued on with solvent free UHU.

A coat of track colour followed by a wash of Humbrol 66 and you'd never notice the repair.

Seagulls

On the back of the layout there are the words "7 seagulls" written in permanent marker. Shortly after we started exhibiting the model, people in the crowd started counting the sea birds and asking if they had seen them all. Since we couldn't remember how many there were supposed to be, we wrote it on the backscene.

It's a good job I counted them again as one had gone AWOL while in storage. The birds are Springside castings so I've painted a replacement and a spare for the weekend. I'm not going to tell you where it will land, that would spoil the spotting fun...

Two 03s

$
0
0
03s

For various reasons, I'm in possession of the latest incarnation of the Bachmann Class 03 diesel. I've owned the Mainline version almost since it came out so it's interesting to compare the two.

My model (on the right) is always the first loco on to Melbridge Dock at the start of each day. It's a tradition that is so old I can't remember how it started, however w stick with it. The loco works one train and then isn't seen until the next morning. I reckon people prefer to see kit-built models, or at least I prefer that they do. I didn't go to all that trouble to run RTR!

Anyway, how do they compare?

Not that badly actually. OK, my model has been worked over with a little detail and flush glazing but the Bachy one is factory weathered and two decades newer.

Old loco has moulded lumps for bonnet door handles but those along the top of the bonnet might be chunky but at least they aren't wobbly in spite of several repairs. The old green looks better to my eye too.

Fuel filers are more prominent on the new model and the rivets a bit more subtle. Old loco is missing handrails around the front steps but I prefer the treatment of the front grille.

The older bonnet itself is a little chubby and you don't get any cab detail but then I'm not seeing that much inside the new version either.

My hand weathering is much better than the factory stuff - I think I see clean bits on the wheels where the con rods shaded then from the spray paint.

Overall, my loco retains its space in the stock box. No heading down the model shop for me this time.

Exhibiting at Leamington this weekend

$
0
0

As you might  have worked out from this weeks posts, I'll be spending this weekend behind Melbridge Dock and Owen's Bridge at the Leamington & Warwick MRS exhibition this weekend. 

There will be loads of good stuff to see so why not download the programme and have a look. Then get in the car, or catch the shuttle bus from the station, and join us on Saturday or Sunday.
 
Do say hello when you arrive - as I always say, it's nice to know people read this stuff.

Shunting

$
0
0
01 shunting

On Melbridge dock, a Class 01 diesel, built from a Judith Edge etched brass kit propels a shunters truck made from a long forgotten whitemetal kits. In the background is a vanwide from Parkside Dundas.

The boxes and barrels are from Kibri (now available from Knightwing), the people from Langley. The warehouse is scratchbuilt from Dalerboard and plastic sheet.

Track is SMP code 75 rail soldered to PCB sleepers. Cobbles from Slaters Plasticard. Point lever, a whitemetal item from Springside.

Nothing in this picture is RTR, even though it is all OO.

If you want to see this in the flesh, head over to the Leamington & Warwick MRC exhibition this weekend.

BEN JONES ATE MY TEACAKE

$
0
0
Tunnocks Van

You see above, a delightful limited edition Peco N gauge wagon. Only available from ModelRail Scotland last weekend, it celebrates the countries greatest contribution to culinary matters, and their most delicious export - the Tunnocks Teacake.

As I wasn't attending the exhibition, I arranged for Ben Jones to collect it for me. As the editor of this countries premier model railway magazine, I felt he could be trusted with this task.

I was wrong.

You see, each wagon was supplied with a delicious Tunnock's teacake. Yet, when the wagon was handed over, no teacake was present. I had been robbed.

The crime scene
After reporting the crime to the local Polis, an Inspector Tagart took my details and ably assisted by PC Hamish McBeth proceeded to look for suspects. 

Obviously there is and obvious perpetrator of this heinous crime, the man tasked with collecting the wagon and teacake in the first place - Ben "Le Train Spotter" Jones. A man who plainly cannot be trusted with chocolate based marshmallow snacks.

Tagart was quickly on the case, "Help ma Boab!It's a braw, bricht, moonlicht teacake" he said which according to Goggle translate means "Don't worry sir, I'll not rest until I crack this case. We take teackake rustling very seriously in Scotland."

It is believed that the suspect is hiding out in Glebe Street, Kintore, possibly disguised as Horace Broon. If you spot him, Polis advise that you hide your chocolate.

Updating couplings

$
0
0
Coupling fitting

When I build rolling stock for a magazine feature, it generally has to be fitted with a traditional tension-lock coupling. However, on my layout, I use Sprat & Winkles.

With Melbridge Dock out last weekend, I decided it was time to retrofit S&W coupling bars. After all, the items of rolling stock had long since appeared in print and it seemed a shame not to be able to run them.

As you can see, the process is pretty simple. Pull off old tension-locks with pliers. Then place the model on my coupling height gauge. Balance a bit of wire or thin dressmaking pin sans head and point on the gauge. Pop some superglue on the bufferheads and roll the loco up to the wire/pin.

Leave to dry and then paint the buffers and coupling wire with some weathered black paint. Then place the loco on the layout and enjoy!

DJH Barclay at work

$
0
0
Barclay Shunting

The Barclay was one of my Hornby Magazine projects years ago and while it looked great, I'd never actually tested it other than a couple of trips up and down a straight test track to prove that everything worked. Now fitted with new couplings, this could change.

I was genuinely interested in how this would work. There is an old thread on RMWeb where several people decide before building the model that DJH don't know what they are doing and re-work the chassis with a new drive system. That rather defeats the point of an easy-build kit aimed at beginners to my mind - if all you want is a Barclay kit then there are plenty of etched alternatives that are cheaper and possibly more detailed.

Not that this is unusual on t'Internet. For years I've been a member of a VW camper forum where various readers have removed heating control bellows and disconnected cooling fans to replace with electric versions. Others then point out that they are assuming their engineering skills are better than those on offer to Volkswagen. If they could have left bits out, they would have done (changing the boot lock button from chrome to plastic saved millions) so it might be a good idea to undo the "improvements" forthwith.

Anyway, my "vanilla" Barclay was lightly lubricated and set up on one of the fiddle yard roads. It spent Saturday shunting away happily, never missing a beat. There is a slight squeak in reverse but I have a feeling that some grease on the gears will sort that. It's not bad enough for me to have fixed it immediately.

Conclusion: This is a good kit that works well if you build it following the instructions. Ignore the people who tell you you must rip out the innards. Keep it simple and enjoy the loco trundling around. You can make your second build complicated if you must. Just finish the first one - it's more than most do.

Wooden doofer

$
0
0
Wooden Doofer

One consequence of not having taken the dock out for a few years is that it's easy to forget important bits of exhibition kit. One of these was the cable connecting a transformer to the point power. I'd taken some orange cables I didn't think we needed from the exhibition box and removed one too many. Good job the show was 10 miles from home or I'd have been improvising with bits of wire.

The other big omission was the "doofer" from the tool box. This is a sort of scriber with a point at one end and a paddle terminating in a slightly concave curve at the other. You could buy them off every tool stall at a show 10 years ago but I haven't seen one for ages.

We employ the dofer to prod down sticky couplings Sprat & Winkles might be 95% reliable but every so often you need to give them a hand, especially when you won't treat them like fragile china.

No problem - I cut the end from a coffee stirrer with some wire cutters and then filed a concave end.

Perfect. Another use for these ever handy refuges from a coffee shop.

Clockwork Tamper in BRM

$
0
0
Deadlines were tight for my contributions for the latest issue of British Railway Modelling.

I do my best to plan projects so they are ready well ahead of the deadline days but sometimes, events conspire against me and there's a few late nights required to push everything out of the door. Chuck in an exhibition absorbing a weekend and some illness picked up at that show and it's wonder that some of this was finished at all.

Anyway, this month you'll find me taking a look at baseboards in both ready made and kit form. 

Baseboard kit

Thanks to the good people at White Rose Modelworks, I found myself with three different options to examine on the DVD and in print. Buying in baseboards is something I've never considered so it was fascinating to have a good look at the products.

If you are going to spend money on a layout then a good, solid and flat baseboard is an excellent way of doing it. Too many modellers mess around with terrible woodwork telling themselves they can bodge it later. It doesn't work and you are never satisfied. That's why I get the wood cut for my boards by someone else!

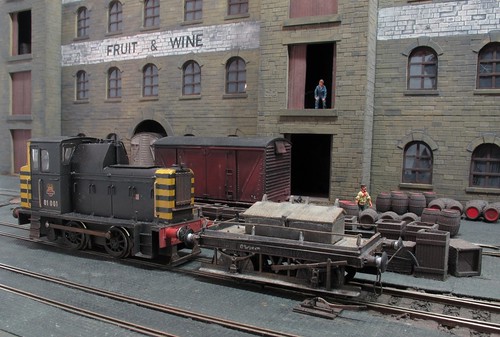
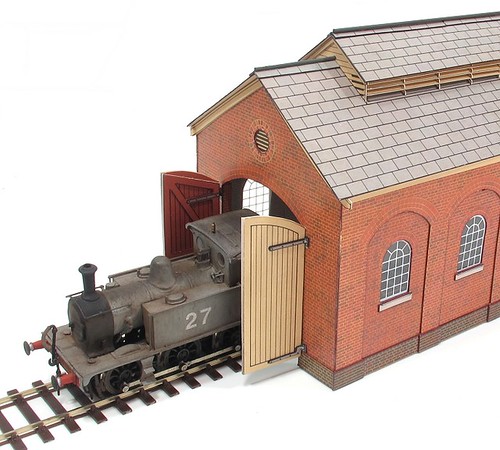
Once you have your boards, you'll be thinking about scenery and so I've built a fairly entry-level cardboard kit for an engine shed.

Engine shed

Me being me, I couldn't help but make a few mods to the basic model and have fitted some basic interior detail. Not a difficult job but when you look through the doors, it certainly improves the model.

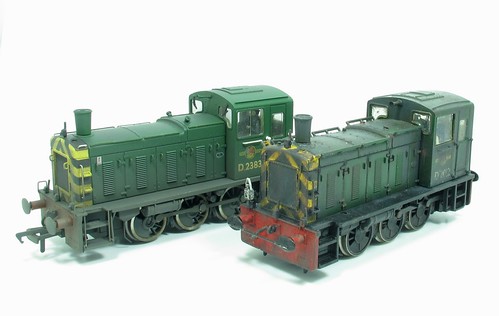
Continuing the kit building theme from the last few issues, I've given a quick run-down of the different types of loco kit available along with some pros and cons of each.

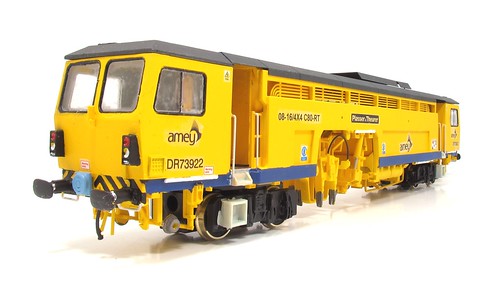
Finally, the kit that caused me all the trouble. Clockwork ideas Plasser 08-16 C80RT ballast tamper.

Ballast Tamper

This is a truly astounding kit, The most multi-media model I've ever built. The largest (84 page) instruction manual I've ever followed. Possibly the best designed kit I've encountered.

You'll need to buy the mag to see the whole journey through this project. Looking at the box I'd thought "A couple of days will have it ready for paint.". In the end, I reckon I spent at least 50 hours on the model, plus painting.

And I enjoyed every one of them.

I only wish I'd allowed more time for the build as it was easily one of the most enjoyable I've had for years. There are a lot of steps but most are easy and all seem to advance the project. It's a bit like reading a really good novel - you just want to keep turning the pages.

The plan was for me to hand the completed model back to the supplier for sale. By the time I'd finished it I couldn't bear to let it go and handed over my own cash to keep it. While I have no need for a modern tamper, some models are just a joy to build and to own. If you can justify a vehicle like this, head over to DC Kits and give your credit card a hammering. It's worth it.

Full details of the April BRM.

Last half hour motive power

$
0
0
If you want to see some interesting motive power at a model railway exhibition, you need to hang on until the end of the day. While we might be oh so sensible most of the time, the last half hour is when decide we don't really care so much.

On Melbridge Dock, the rule is that all wagons are shunted off the layout with a loco. No picking up things by hand. Sometimes it's nice to run stuff that's been sat in the cabinet all weekend.

Garratt on passenger train

For a three coach passenger train, you don't really need a Garratt. But we have one and I like to run it.

Titch and tarpaulin wagons

Titch, the petrol powered shunter isn't particularly powerful thanks to only being driven on a single axle. Rev it up a bit though and it can still haul a few wagons around.

Ruston Shunting vans

Thanks to a bonnet full of lead, our Ruston 48DS is rather more capable than the prototype was and can easily handle a siding full of vans.

It's not an automatic railway...

$
0
0
Controller

So there I am, operating Melbridge Dock quite happily and someone asks, "Is it automatic?"

No it's not, I reply and show them the hand held controller.

"Oh, I could see you changing the points but didn't see anything else so I assumed it was some clever automatic system. "

This happened 5 times over the last weekend.

I'm obviously too casual about all this. Leaning on the backscene making the layout work with the controller in my paw. Maybe I need to look like I'm dragging cast iron levers around and sweating like a pig. They might think I'm doing some work then...

Leamington 2015

$
0
0
Micro layout

An even more narcissistic post than normal today I'm afraid. At Leamington I had taken both Melbridge Dock and Owen's Bridge to display which meant very little time to look around the show. To be fair, Owen's bridge made life a bit easier by being a static exhibit all weekend now the loco has given up the ghost.

You've already heard that Melbridge ran extremely well so I'll not go on about it. We weren't half glad we brought a rug to stand on behind it, that concrete floor is super hard.

Saturday started as any show - people out the front but no-one talking or even smiling. This changed through the weekend though and Sunday, which thanks to a real push on family tickets was as busy as Saturday, was a blast with loads of chat and several visitors questions answered.

Bus peeking

Outside the barriers, the layouts that caught my eye were Sidmouth by Richard Harper - P4 on it's first trip out. Beautifully modelled with some excellent structures.

I also loved Hobbs Row Halt at the top of this post, but then I love a micro layout and this one might be a bit of a gimmick but isn't it full of character?

Trade was better than ever with a new supplier to me, Severn Models, enticing me to hand over money that I hadn't expected to spend. Elsewhere I picked up big sheets of plastic, many half reels of wire from the second hand stall and a few other small bits.

Sausage Bap

Food, well I didn't get any cake but the cafes sausage baps at £2.75 each were a filling bargain and kept me going all Sunday even though one of the whopping bangers rolled off on to the floor and had to be discarded.

Excellent show - possibly the best the club has ever put on.

Photos on Flickr.

Old fashioned Moggie

$
0
0
Man and moggie

Back in what we call "the good old days", if you wanted a model car, you had to build the thing yourself. None of this nipping down the local model shop for something diecast. When Melbridge Dock was built, the only scale diecast cars were a set of open-top sports numbers from EFE. And you had to buy them in sets of four.

Wanting something more traditional for the corner of the layout, I picked up a Springside four door Morris Minor whitemetal kit.

It wasn't pretty.

My experience of the firms vehicle kits has never been good - part fit is often poor and they don't look quite right. Odd really, as the same people produce loco kits that in my (and others) opinion are superb.

The Moggie kit included 2 roof mouldings, which was handy as I used both of them since neither was long enough. At the time, I'd have been much happier with a diecast. As I recall, the model is soldered together. That sounds harder than glue but when making two roof parts become one (to paraphrase the famous Spice Girls song on the subject of kitbuilding) it's easier as the "glue" is also a filler.

None of this explains why, when searching through my stash of old kits, I found another example. Must be a glutton for punishment...

Springside Moggie kit box
Viewing all 4471 articles
Browse latest View live


<script src="https://jsc.adskeeper.com/r/s/rssing.com.1596347.js" async> </script>